Building an Appliance Images
Building an Appliance Images
In an earlier post we introduced the Ubuntu Appliance Portfolio. In this post we’ll show you how you can build your own appliance image.
Why Create an Appliance Image?
We’re going to walk you through creating custom appliance images using the tool ubuntu-image. But before we do it might be helpful to explain why you might want to do this. You will need to build a custom image if you’re doing one of the follow:
- Porting Ubuntu Core to an unsupported board (device), OR
- Building a custom device with preinstalled snaps.
The process of porting Ubuntu Core to a new (unsupported) board is called “Board Enablement”. This process involves creating a custom kernel snap and gadget snap for the device. Then you build a custom image with these snaps. Board enablement is out of scope for this post, but we’ll address this in another post.
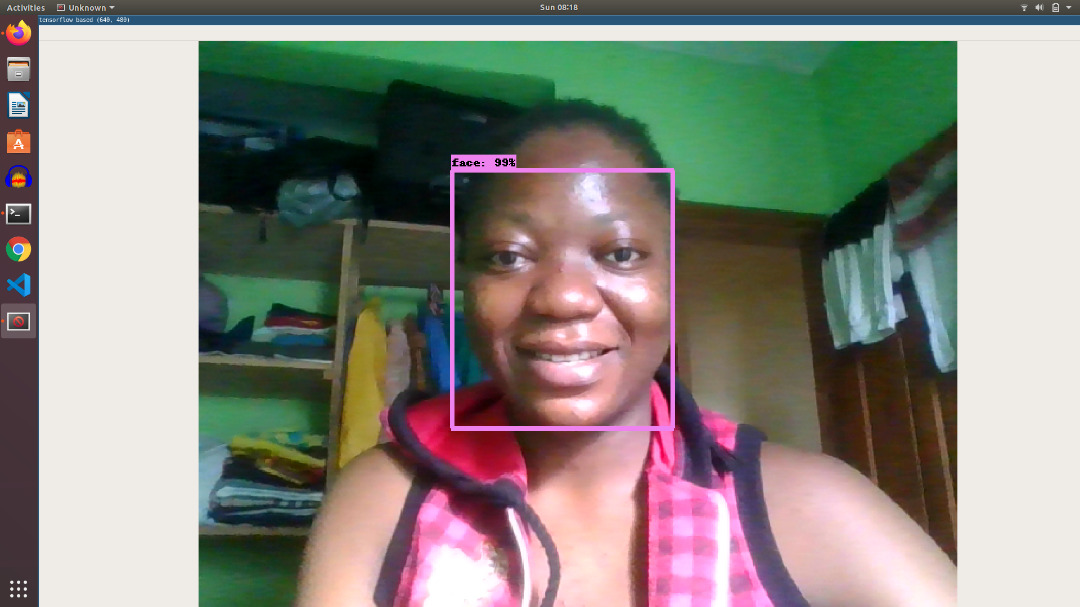
Alternatively, you could be working with a supported board, but you want to created a specialized device with your custom software and configurations. An example of this could be creating a kiosk with a raspberry pi to display a menu in a restaurant.
Before You Start
We’ll be building an appliance image for the Raspberry Pi 3, so you’ll need the following before starting:
- Raspberry Pi 3
- SD card >=4GB
- Stable internet connection (you’ll download about 500MB)
- Computer running linux (this is where you’ll create the image)
- USB keyboard
- HDMI monitor
- Ubuntu SSO account (if you don’t have want already here are some directions)
Also you will need to install a few dependencies:
- Snapcraft: If you don’t already have it installed run:
snap install --classic snapcraft
- Ubuntu-image command:
snap install --classic ubuntu-image
- rng-tools (optional):
sudo apt install rng-tools
Understanding the Build Process
The build process involves two basic steps: one, creating a signed model assertion and two, creating a bootable image from that model assertion. The “model assertion” is just a digitally signed description (in JSON format) of the image you’re creating. For example, our model assertion will say that we’re planning to install on a raspberry pi 3, and that we want to install the pi-kernel and pi-gadget snaps. Once you have the signed model assertion you pass it to the ubuntu-image command and it handles the magic of producing the image.
Signing your model assertion
Create a signing key
First you’ll need a signing key registered with the Ubuntu Store. You can check which keys you have registered with snapcraft list-keys. You maybe be asked to login if this is your first time using snapcraft; in this case use your Ubuntu SSO credentials to login. If you don’t have any keys registered, you’ll want to create a new one. You can create a new key with: snapcraft create-key foo. (Replace foo with any name you’d like to name the key). You will be asked to create a passphrase for the key. While you can leave it blank, it’s a good idea to set one.
Register the key
Once you have a valid signing key, you can now register it with the Ubuntu Snap Store. Run the follow command: snapcraft register-key. You’ll be asked to login with your Ubuntu SSO again. If you have more than one key created, you’ll choose which key to register.
Creating a Model Assertion
First open your text editor of choice, and paste the following into a new file. Next we will be replacing the field values that are in <angle brackets>
{
  "type": "model",
  "authority-id": "<your account id>",
  "brand-id": "<your account id>",
  "series": "16",
  "model": "<my-custom-pi3-model>",
  "architecture": "armhf",
  "base": "core18",
  "gadget": "pi=18-pi3",
  "kernel": "pi-kernel=18-pi3",
  "timestamp": "<timestamp>"
}
Replace the follow values
| Key Value | Replace with | Where to find it |
|---|---|---|
authority-id |
Your snap account-id | Login to your Ubuntu One account and click here: https://dashboard.snapcraft.io/dev/account/ |
brand-id |
Your snap account-id | (same as authority-id) |
model |
This is the name of the model you’re creating. Name it anything you like. | |
timestamp |
Replace with the current time stamp | Run this command to get a properly formatted timestatmp: date -Iseconds --utc |
After updating the model with these changes save the file to something like pi3-model.json. Make a note of where you saved the file. You now have a model assertion that’s ready to be signed.
Sign the model
The last step is probably easiest:
cat pi3-model.json | snap sign -k foo > pi3.model
Make sure you replace pi3-model.json, if you named your mode something different. Also, replace foo with your actual key name.
Build the Image
Now you’re almost there! Run the follow command to build your image:
sudo ubuntu-image -O pi3-image pi3.model
The -O pi3-image tells ubuntu-image where to save the output. Make sure to replace pi3.model if you named it something else.
If all went well you’ll have a file call pi.img in the output directory (here we named it pi3-image).
Running your custom image
You will follow the exact same steps for installing and running your custom image as you would with a prebuilt image. Follow the steps from this post: Installing Ubuntu Core on Raspberry Pi
But obviously you can skip downloading the prebuilt image in step 2. Also you’ll want to make sure you select your custom image in step 3.
Customizing your Appliance Image
At this point you should have a custom Ubuntu Core image installed and working on a raspberry pi. However, you may have noted already that this custom image isn’t very different than the prebuilt image. We will go into much more details in future posts, but here are few options you can try to get started.
ubuntu-image -c beta- When running
ubuntu-imageyou can use the -c option to specify the channel that the snaps should be downloaded from.-c betafor example will download from the beta channel. You could also try-c edgeand-c candidate
- When running
ubuntu-image --snap lxd- The
--snapoption will include a snap preinstalled on the image. Here we’re saying thelxdsnap should be installed by default. You can also include local snaps files by giving a file path instead of a snap name
- The
ubuntu-image --cloud-init user-config- This is probably one of the most interesting options to try. It will copy over cloud init config file to be installed on the device. This offers a great amount of configurability to your device. However, this is probably one of the more tricky options to configure properly, but we’ll definitely be looking at this in the future. You can read more about cloud init here: https://cloudinit.readthedocs.io/en/latest/
Hopefully this will get you started with customizing your Ubuntu Core image. Until next time, happy snapping. :D
Latest Posts
Building an Appliance Images
12 Dec 2020
A First Look at Ubuntu Appliance Portfolio
18 Oct 2020